The Play Area
The majority of the screen estate is compromised of the Play Area. Whenever you touch this area, the closest Cursor which is not locked will be activated, and assigned instruments will play.
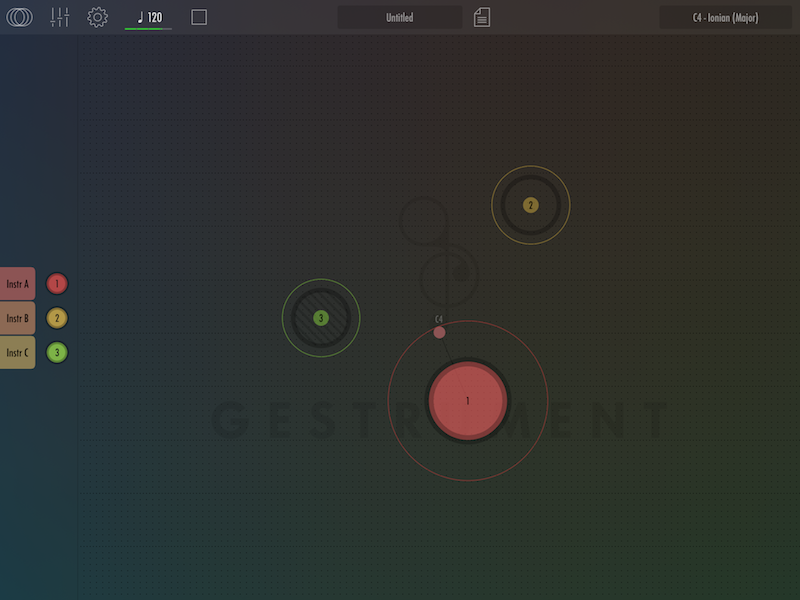
By default, the X-axis (left-right) corresponds to note duration. If your finger is to the far left, notes will become longer/slower, and to the far right they become shorter/quicker.
Similarly, the Y-axis (up-down) corresponds to pitch; as in higher notes are triggered up top and lower notes at the bottom.
To summarize: Left = Slower music, Right = Faster music. Up = Higher notes, Down = Lower notes. However it is not necessarily so, and it all depends on how you set up the instruments.
Cursors and Instrument indicators
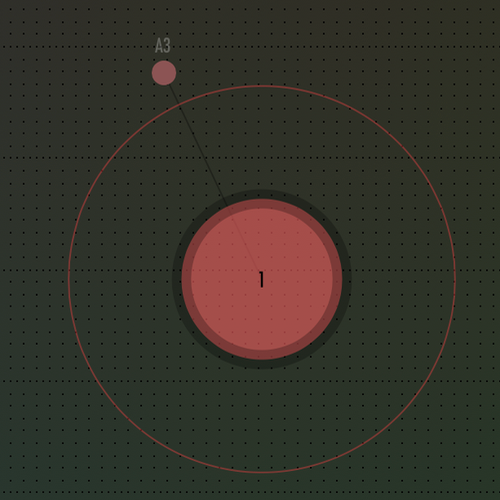
Cursors are the core performance components of Gestrument Pro. Whenever you touch the Play Area, the cursor closest to your finger/pen will snap to and follow its position. When a cursor is active it will be filled with a color.
Once activated a cursor will start to trigger notes, visualised by a dot extending from it - an instrument indicator. The visualization is usually the result of the position of the cursor in relation to the settings of that specific instrument.
A larger thin circle around a cursor indicates the current cursor pressure, which is a control source and can be mapped to different parameters in your instrument, for example instrument velocity.
When you move a cursor, it controls all Instruments associated with that cursor. The Instruments will produce sound with either the internal sampler, or control external synths via MIDI.
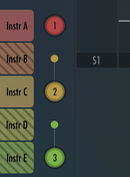
Cursor list/Instrument tabs
Cursor list
To the far left there is a solid dark grey panel with colored circles and tabs. The circles represent the playable cursors, while the tabs represent instruments.
The first rectangle with the label Instr. A is the first instrument. In the basic example in the picture it is controlled by Cursor 1, while Instruments B and C are both controlled by Cursor 2.
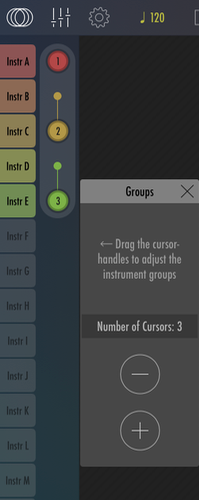
Cursor Assignments
On the top left there is a button with three overlapping circles. Tap it to open cursor settings. Here you can manage the number of cursors and instruments associated with them.
You can add more cursors, up to 8, by tapping the plus-sign. You decrease the number of cursors by tapping the minus-sign.
Note that the iPhone can only handle a maximum of five fingers, so only five cursors can be played simultaneously. On iPad you might want to consider disabling four finger swipe and similar gestures in iOS settings to avoid accidentally switching apps etc.
You can group several instruments to a cursor by grabbing the cursor-button next to the instrument tab and dragging it up or down, assigning instruments as you drag. There can be a total of 16 instruments spread over 8 cursors.
Per Cursor Settings
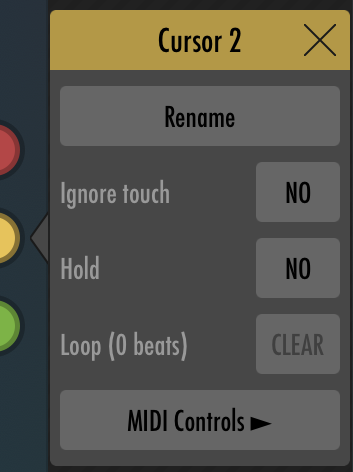
Long pressing on a Cursor will open up a different settings for that particular cursor.
- Tap Rename to give the cursor a different name, which will be displayed in the Play Area.
- Toggling of Ignore touch will lock the cursor from being affected by user input. This is useful for looped cursors which you might want to be protected
- Setting Hold to YES will keep the Cursor activated regardless of user input.
- Loop shows the length of the currently recorded Loop for said Cursor. Tapping Clear will remove the loop data.
- MIDI Controls Provides quick access to the MIDI input assignment for that particular Cursor. This allows you to control the Cursor from an outside source that sends MIDI, such as (but not limited to) the Gestrument Kinect Converter.
Muting an instrument
Tapping on an instrument tab will mute said instrument, visually represented by a striped pattern. A muted instrument does not produce sound until it is unmuted. Tap again to unmute.
You can also mute all instruments associated with a cursor by tapping the corresponding cursor-button in the cursor list. Tap it again to unmute all instruments associated with that cursor.
Long-pressing an instrument tab will instead open the instrument settings, which we will have a look at in Instrument Settings.
Sliders panel
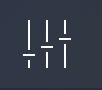
At the top left corner of the screen there is a button with three faders (vertical lines with intersecting smaller horizontal lines), which opens and closes the Sliders panel.

Sliders are incredibly powerful tools for dynamically adjusting your music. Almost every instrument parameter in Gestrument Pro can be assigned to a slider, something we will look closer on in chapter Control Sources.
To rename a slider long-press on the label below each of them.
You can close the Sliders panel if you want to have the biggest possible play area.
Panel Buttons
Scale Switcher Matrix
 Below the sliders you will find the Scale Switcher matrix, composed of 8 button slots. Each slot can house a global scale or chord which will be applied to the instruments across your preset. These are designed to allow you to quickly modulate between different musical keys etc., instantly changing the tonality of your composition.
Hold
At the bottom of the Slider panel, there are three elliptical buttons named Hold, Loop and Clear.
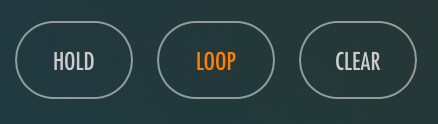
If you tap Hold, all currently touched cursors will be locked in active state even if released. To stop holding simply tap Hold again without touching any cursors. You can also hold Hold and tapping any cursor to toggle it on or off for that cursor individually.
Loop
The movement of both Cursors and Sliders can be recorded and looped individually. To loop a movement, tap and hold the Loop button while you perform a gesture, then release to mark the end of the loop, and Gestrument will loop it.
You can make multiple loops by repeating the same procedure with another cursor or slider.
To stop loop playback, tap the stop button next to the tempo at the top of the screen. Loops will start playing again the moment you touch a cursor or when pushing Play.
To remove all loops, tap the Clear button and a dialogue will open up to make sure you really want to delete all loops. To delete a single loop, tap and hold Clear while touching a cursor or slider.
The loops can be of different length, and their quantization is defined in ‘Quantize loops’, you can read about that in Clock.
Settings
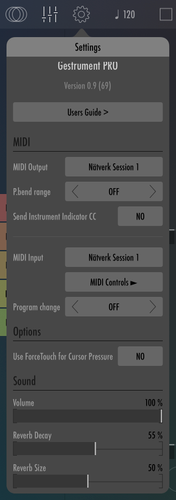
Tap the cog wheel icon at the top left corner to show the Settings menu.
MIDI
Gestrument Pro can connect to your computer, controller, other outboard gear as well as other apps running on your device that can send and receive MIDI-data. See chapter 4 for different ways to connect Gestrument Pro to the outer world.
MIDI output
This field displays your current MIDI-output port (default is None). Tap, and a list showing all available MIDI outputs pops out. Choose the MIDI-port of your preference to start transmitting MIDI.
Pitchbend range
P.bend range stands for pitchbend range and is used to support microtonal scales when playing external synths. By setting the pitch bend range Gestrument can calculate the correct amount of pitch bend to reach non-12TET (non-12-tone equal temperament) pitches (i.e. microtonality) when outputting MIDI. This can be set from 1 to 12 semitones and should match the pitch bend sensitivity of the connected synth.
Send Instrument Indicator CC
By turning Send Instrument Indicator CC on, you enable Gestrument to send the X/Y-position of the instrument indicator as a MIDI Control Change Messages on the same channel as the instruments sends MIDI-data. When enabled, instruments will send the X-position as MIDI CC 16, and Y-position as CC 17. It will also send CC 18 messages with a value of 127 when the instrument triggers a new note.
MIDI Input
This field displays your current MIDI-input port (default is None). If you tap this menu, a list showing all available MIDI inputs pops up, choose the MIDI-port of your preference to start receiving MIDI.
MIDI Controls
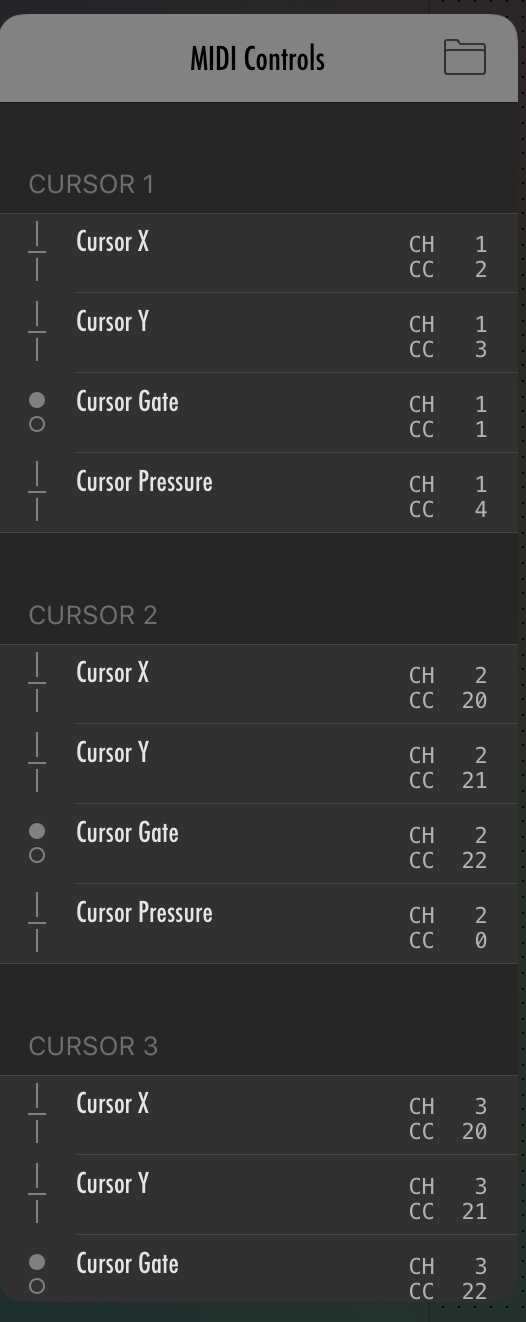
Tap the grey button labelled MIDI Controls to open the MIDI Controls menu. At the top right there is a Folder button, tap it to open a list of saved mappings, or save the current mapping by tapping the plus-sign.
To create a new mapping, tap the parameter you want to map incoming MIDI-messages to. A panel pops up at the bottom where you can manually choose which channel and CC (MIDI Control Change Message) you want this parameter to receive. You can also switch from CC to receive Note messages instead. There is a green LEARN button, to automatically learn the mappings you want: simply tap LEARN (when activated it turns flashing orange), press the key or turn the knob on you MIDI-device and Gestrument will learn and do the proper assignment automatically.
The MIDI Controls menu list all possible parameters that can be controlled by MIDI-messages. All 8 cursors are listed and each cursor has four parameters: Cursor X, Cursor Y, Cursor Gate (activates the cursor and make its instruments produce notes) and Cursor Pressure (controls the ‘Cursors pressure’ control source).
All MIDI messages have a value between 0-127, so if you want to control cursor’s X/Y think of the play area as a coordinate system with 128 points x 128 points.
Program change
Here you can choose a MIDI channel on which you can receive program change MIDI messages to load presets in Gestrument. You can load any of the first 128 presets, they are numbered in the same way as in the Preset menu.
Options
Use Force Touch for Cursor Pressure
If you have an iPhone with force touch (iPhone 6s and newer) you can control the ‘Cursor Pressure’ control source (see Cursor pressure) by adjusting the amount of pressure you apply with your finger to each cursor.
If you are using the Apple Pencil on an iPad Pro you can use the force touch for Cursor pressure to control Cursor pressure by adjusting the amount of pressure you apply with the Apple Pencil.
When this option is set to NO, or your device does not support force touch, ‘Cursor Pressure’ will be controlled by the size of the touched area for each finger.
Sound
Volume
This is the main volume setting for Gestrument Pro, use this to fine tune the output volume.
Reverb decay
Reverb decay is the time required for the reflections (reverberation) to die away. This emulates how long it takes for the reflections to run out of energy and become silent.
Reverb size
Reverb Size controls the size of the room you are emulating. Higher setting equals emulating a bigger room and vice versa.
Global buttons

Clock
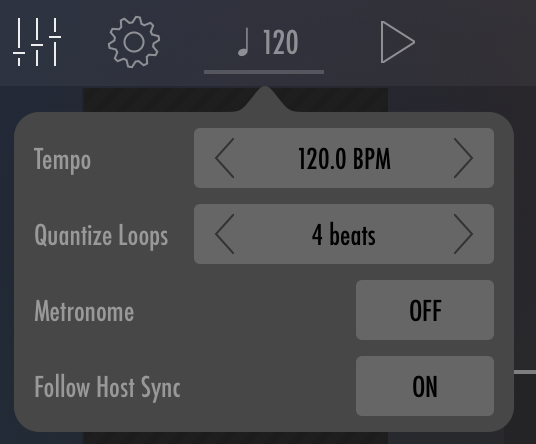
To the left at the top bar is a quarter note icon followed by a number. This displays your current tempo as beats per minute (BPM). The clock flashes white at every beat in the specified tempo, and yellow on the first beat of a 4/4 bar.
Tap it to open the Clock menu, where you can change the tempo, loop quantization, and enable the metronome.
Tempo
To lower the tempo, tap the arrow that points left and to raise the tempo tap the arrow that points right. If you want to change the tempo faster you can drag to the left for lowering the tempo and to the right to raise the tempo. You can also double-tap the number to show a popup for numeric keyboard entry. NOTE: The same goes for any numeric entry in the app, not only tempo.
Quantize Loops
The Quantize Loops can be set to define the quantization of your loops. Turn off quantization by setting it to FREE. For instance, if you set it to 4 beats your loop’s start and end points will be quantized to multiples of 4 beats. This can be compared to looping its start and end points to one or several 4 beat bars.
Metronome
The metronome can be turned on and off by pressing the button which displays the metronome’s current state. The metronome ticks a 4 beat bar with the first beat as a higher tick.
Follow Host Sync
When enabled, Gestrument Pro synchronizes with its Inter-App Audio host, following its transport state and tempo.
Play/Stop
Toward the left at the top bar there is a play/stop-button. Tap it to start or stop the clock. When stopped, it will stop any held or looped gestures. The clock will automatically start when you touch a cursor or start recording a loop. When the clock is running you see the play/stop-button as a stop-sign. When the clock is stopped the button displays a play-sign.
Preset menu
In the center of the top bar you will find the Preset menu. Tap it to show the menu with the pre-made factory presets as well as your own saved or imported presets.
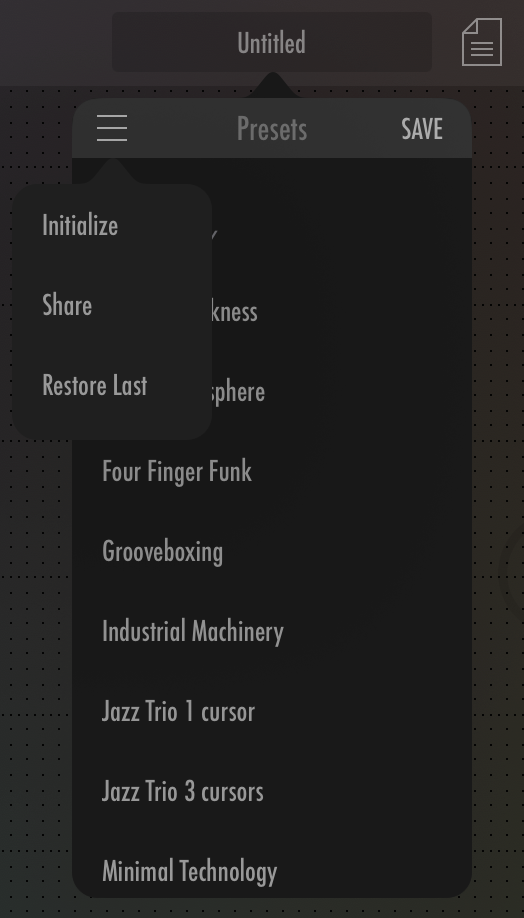
To the top left there is a menu button where
you can choose between:
Initialize: Brings all settings back to default. A blank slate to work from.
Share:
Share your current preset via the share dialogue by various methods such as
messages, mail, Dropbox, iCloud and many other ways. It also lets you upload
your presets to iCloud or Dropbox so you can back it up or share with another
device.
To load a preset from iCloud, go to iCloud, press your preset-file, the share button and ‘copy to Gestrument Pro’. Now your preset is saved locally on your device.
If you receive a preset by for example mail simply tap the ‘.g2preset’-file and choose ‘copy to Gestrument Pro’.
Restore Last: Restores your previous state. This allows you to you undo if you accidentally loaded a preset without saving the current one first.
To save a preset tap the save-button at the top left of the preset menu, give it a suitable name and tap SAVE.
If you want to delete a preset, swipe it to the left and a red delete-button will show up. Tap it to delete your preset.
To update a previously saved preset, tap the save-button, keep the same name and tap SAVE.
You can import and export presets with the iTunes file sharing system through your computer, which we explain in detail in Sharing and importing with iTunes file sharing .
Preset Notes
Each preset can be supplied with an individual note, in which you can describe the intended way to play your preset, information of what parameters do, name of the author, a website adress or similar. Tap on the Note icon to open the text box. If Show when loading this preset is set to YES, the note will pop up each time that preset is loaded.
Global Scale
At the top right corner you will find the global scale button, where you can select or edit the scale for the currently selected global Scale Slot. You can also select or edit local scales for each Instrument in Instrument settings (see Scale map ). Tap the scale button to display the Scale editor.
Toward the top left of the scale editor is the preset scale menu. It lists the available factory presets and your own saved scales. There is also a label to the right of the scale which tells you if the scale is a scale, kit or MIDI-file. The current scale is displayed with a blue checkmark.
To delete a scale, swipe it to the left and a red delete-button will show up. Tap it to delete your scale.
Just left of the menu is a hamburger icon. Tapping on this gives you a few options, such as New Scale, New Kit, Save, Copy and Paste. The latter are self explanatory, however, what is the different between New Scale and New Kit? Both are different approaches to scale creation.
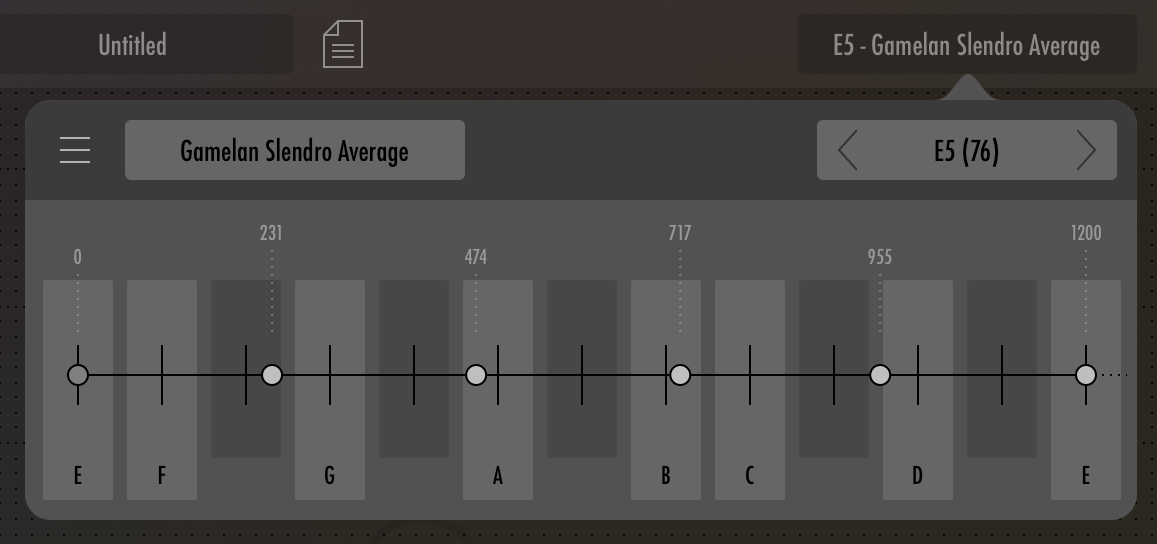
The Scale mode looks like a line on top of a keyboard. The Scale mode gives you freedom to make different scales to your own liking, even outside the diatonic or chromatic scale. In the top corner there is a button for choosing the root of your scale. The root note is displayed (with middle C namned C4) and the MIDI-number in parentheses. To change the root note, tap the arrows or drag the value left or right. You can also double-tap the value to get a dialogue where you can edit the root note by typing the note number using your keyboard.
To make your own scale simply tap along the line at the different pitches you want to include. Gestrument displays the distance from the root note in cents or as a intervallic ratio for each included pitch. You can edit the exact pitch in cents or ratio by long-pressing on the pitch you want to change. A dialogue will pop up where you can edit the pitch by typing the distance in cents from the root or as an intervallic ratio. Entering ratios is useful if you want to work with different kinds of intonation. Microtonal notes are supported by the internal synth, and also sent with the MIDI data to external synths using pitch bend (see Pitchbend range). Scales can be defined over a maximum of 2 octaves, the scale repeats itself automatically in intervals of its highest pitch, which do not necessarily have to be octaves.
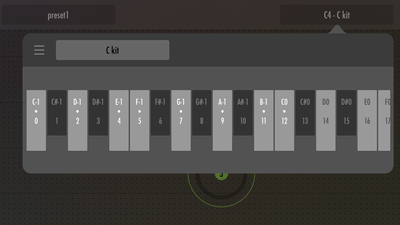
The Kit mode looks like a keyboard and is great for making drum and percussion maps. To make a kit simply tap the keys corresponding with the notes you want to have in your kit. In Kit mode you have to enable the notes you want in each/every octave. To navigate through the different octaves, simply scroll to the left or the right.
You can also use a MIDI-file as your scale. Import a MIDI-file by opening it from a file manger, a messaging service (see different ways of importing files to Gestrument in Preset menu and Sharing and importing with iTunes file sharing) or import it from ScaleGen. When a MIDI-file is imported you can choose it under USER scales. The scale editor will then display the pitches in the MIDI-file.
Instrument Settings
The Instruments Settings is not one global setting but an individual menu for each active instrument. In Instrument Settings you edit the settings for the instrument’s sound and how they behave corresponding to the input from both the parent Cursor of said instrument, as well as any slider or parameter assigned.
To open an Instruments Settings menu, long-press on any instrument tab you want to make changes to. A panel will pop up with the same name and color as the tab pressed.
Instrument copy/paste/init
At the top left of the Instrument Settings there is menu button. Tap it to show a menu with several options for managing multiple instruments such as:
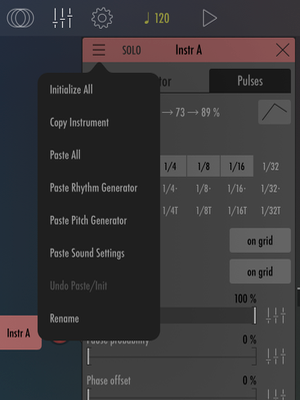
Initialize All:
Reloads the instrument to the default setting.
Copy Instrument:
To make the same settings on multiple instruments you first copy
your master/blueprint instrument and then you choose which parts to paste.
Paste All:
Pastes all instrument settings.
Paste Rhythm Generator:
Pastes the rhythm settings of the master instrument only.
Paste Pitch Generator:
Pastes the pitch settings of the master instrument only.
Paste Sound Settings:
Pastes the sound settings of the master instrument only.
Undo Paste/Init: Allows you to undo your last settings paste or initialization.
Rename: Allows you to rename the instrument.
Solo
At the top bar there is a SOLO button which allows you to audition your current instrument by muting all other instruments. To unmute your other instruments tap their instrument tabs or the corresponding cursors as described in 1.2.3 Muting an instrument .
Break-Point-Function
A central concept in Gestrument Pro is the Break-Point-Function (BPF), which can be used to remap how an instrument interprets its Cursor's X/Y-position for the settings Rate and Pitch in Scale map and Chord Select, as well as all mappable parameters.
To open a BPF in Instruments Settings, tap the line-graph-shaped symbol next to the labels Rate, Pitch or when you have chosen a Control source.
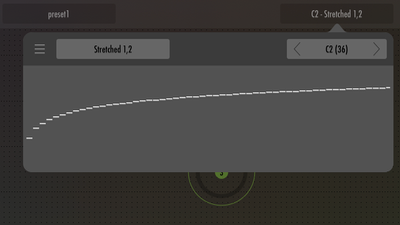
If you have opened the BPF for rate, the default setting is 0 - 50 - 100% which means that the durations are evenly spread across the Cursor X-axis on the Play Area. However we can, as shown in the example to the right, change the middle point to 25% which will weight the mapped axis towards the lower end. With this setting 25% is the middle point of the axis. To operate the Break point function grab one of the three dots that works as handles for the three break points. The middle break point can be put into a straight position between the first and the third break points by double tapping on it. You can also scale the break-point function from a slider by using the ‘via’-function at the bottom under the BPF. We will delve more into ‘Via’ in chapter Via . By using Via, there are many more options for manipulating the break point function.
Mapping instrument Parameters to Control Sources
In the instrument settings you can see that most parameters have an icon with sliders to the right of the controls. The slider icon looks like 3 vertical lines with smaller horizontal lines intersecting the vertical lines. If you tap one of these, it will open up the Control Source menu, listing all the available sliders and other modulators. You can read more about control sources in Control Source.
The Rhythm Generators
Your instrument has three parts: rhythm, pitch and sound. The Rhythm generator is the part of your instruments that makes rhythms and is located at the top of the panel. In the Rhythm generator, you can edit settings for durations, rhythms and other settings such as legato and randomness. Currently, there are two rhythm generators: Pulses and Pattern, but we will expand with additional Rhythm Generators in the future.
To change rhythm generator, tap the black button to the right of ‘Rhythm Generator’.
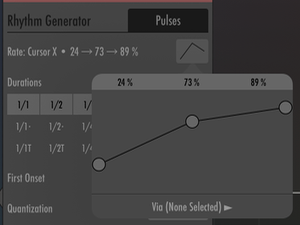
Pulses
Pulses is one of Gestrument’s Rhythm Generators. Pulses maps durations as a continuum along the play area’s horizontal X-axis, by default from the longest to the left and the shortest to the right. So if you move the cursor to the left it will play slower notes, and if you move the cursor to the right it will play faster notes. This mapping can be changed using the Rate BPF.

An instrument using Pulses as its rhythm generator will make notes on the grid as you move its cursor around.
Rate in Pulses
Rate is the parameter that controls the note duration, which is hard-wired to Cursor X-position. It has a BPF (see Break-Point-Function ) which can remap the way it interprets the Cursor X-position. Tap the BPF button to open its Break-Point-Function editor. As you change the rate function you can see how it changes the x-axis by looking at the top of the play area, where you can see a visualization of the durations outlined with brackets.
Durations
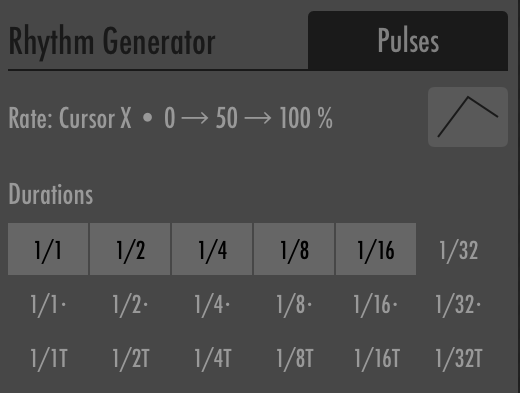
The second option in Pulses is selecting all the note values you want for this instrument with the Durations selector. The durations are outlined as fractions and corresponds to the regular note values of music meter, so 1/1 equals a whole note, 1/2 a half note and so forth. A dot after the fraction means that it is a dotted value i.e. the value of the fraction and a half. A ‘T’ after the fraction means that it is a triplet, which means that three notes fits into the time it take to play two notes of the base note value/fraction.
To include a duration tap the note value you wish to include, and tap it again to exclude it.
It is also possible to manually define durations by long-pressing an existing duration. This opens up a dialogue in which you can edit the duration as a fraction of a whole note. This is described as ’n’, ’n/n’ or ’n/n/n’ and you can add a ’T’ for triplet or an ’.’ for a dotted value. E.g. a note value can be described as ’3’ for a triple whole note, ’1/4’ for a quarter note and ’4/8/5’ for an eight note quintuplet (the third value describes an additional division). You can even combine note values by adding ’+’ in-between, e.g. ’1/8+1/15’.
The note values are sorted according to their actual duration along the x-axis of the play area. Gestrument visualizes the distribution of note values along the top of the x-axis for the selected instrument when you are in its instrument settings. Note that this changes if you use the Rate break-point-function to change the distribution.
Quantization
You can set Quantization to either On grid or Stream. On grid quantizes all onsets on the grids of the durations relative absolute clock start, while stream allows syncopes to happen if a long duration comes after a short. Think of it as On grid is always on time with the current duration and Stream creates a stream of notes of the current duration.
Legato Probability
Determines how likely it is that consecutive notes of the same pitch are tied together. Lowest probability will always re-trigger a note while highest probability will always tie the notes together, only triggering a new one if the pitch or duration is changed by cursor or modulator movement.
Pause Probability
Determines how likely it is that there will be a pause instead of a note.
Phase Offset
Makes the onset start later and works as a delay for the onsets. If you set the phase offset to 50% the note will start at half of the current note value you are currently playing. If you set Phase Offset to 100% it will start one full note value later.
Phase Offset Quantize
You can quantize the phase offset to one of the selected durations.
Velocity
The strength of the note (as in pianissimo or forte) controls the MIDI note velocity between 0-127 for notes played by this instrument. The velocity is often mapped to volume and/or intensity in the synth, but it highly depends on the sound. To achieve a less mechanical result where every note has the same velocity, consider scaling velocity using a slider, touch pressure, or a slight random value.
Pattern
Pattern is Gestrument Pro’s step sequencer. Pattern has two variables for each step, one for velocity and one for probability (the probability of an onset).
When selecting Pattern, the Rhythm Generator section changes to incorporate a small thumbnail of the current pattern. Tap it to open the pattern editor.
Choose the number of steps you want through tapping the arrows, dragging or double-tapping the value at the bottom. You can switch the view between velocity and probability by tapping the corresponding label. You can have between 1-64 steps for your Pattern.
If we select "probability" and tap a circle, it will be colored while also activating said step. Tap again and it will be deactivated. To set the amount of probability, tap the step and drag up or down. You can see that the circle fills with color showing how big the probability is for the step to trigger an onset. Long-press a step to toggle a tie which will sustain the previous note, this can be done for multiple consecutive steps.
To set the velocity for your steps switch to the velocity view, tap a step and drag up or down to change the velocity for the step. The two views interact and if you make a step or a tie in either it will show up in the other.
For example if you set the pattern length to 8 and then turn steps 1 and 5 on, it will yield a standard four on the floor pattern. This means that every beat will trigger a note if the pattern is driven by 1/16 durations. The pattern will apply regardless if the voice is playing half-notes, eight-notes or triplets and so on.
When using Pattern, the tempo of the step sequencer is determined by which duration you have enabled together with the instrument’s Cursor X-position in the play area. The triggers created by Pattern is shown on the play area by displaying the sequencers pattern position along the full length of the X-axis.
A more conventional approach to patterns is to lock the durations by enabling only one duration in Durations; eighth-notes for instance. This means that the rhythmic pattern will always be played the way you made it, and not be skewed with some parts of the pattern happening to land on a half-note or quarter note, or even worse, a triplet! Unless that is what you were going for, or course.
Rate in Pattern
Rate works like in Pulses and has a break-point-function that maps your durations on the X-axis. Read more in Pulses.
Durations in Pattern
Durations in Pattern is also the same as in Pulses and governs which pulses that are allowed for your pattern, i.e. the basic pulse of your pattern.
Reset on touch down
This setting allows you to reset the pattern to the first step each time the Cursor is touched/enabled. If false, the pattern will continue playing from the last played step.
Legato probability
Functions in the same ways as in Pulses, see Legato Probability.
Probability tilt
Tilts the probability for all the steps between -100% to 100%. When shifted towards 100% the probability increases, even if it has a small probability in sequencer. At 100% all active steps will have full probability. When at 0% the Pattern will be played as set in the sequencer. At -100% no steps will be played.
Velocity scaling
Allows you to scale the set velocity of the steps in the Pattern. This can be set between 0%-100%.
The Pitch Generators
The pitch generator determines the pitch of the instrument. There are currently two Pitch Generators: Scale map and Chord Map.
Scale map
Scale map is one of Gestrument’s Pitch Generators and it maps the pitches of your scale across the Y-axis, by default with the lowest notes at the bottom and the highest notes at the top. Think of it as a piano keyboard standing up.
Pitch in Scale map
Pitch is the parameter that controls the pitch, which is hard-wired to Cursor Y-position. It has a Break-Point-Function (see Break-Point-Function) which can remap the way it interprets the Cursor Y-position. Tap the BPF button to open its Break-Point-Function editor.
Scale
Scales can be set either globally or locally. To set it globally see Global Scale, you can also set it locally for individual instruments. To enable local scale, tap the button directly to the left of scale. Tap again to switch back to using the global scale. Tap the scale to open the Scale Editor which works the same way as for the Global Scale, where you can load ready-made or saved scales, or edit the current scale. Read more in Global Scale. A common use case for local scales would be for percussion instruments using a Kit scale.
Max pitch
Max and Min pitch sets the range of allowed pitches for this instrument. Max pitch sets the highest note the instrument can play. This can be set between C-1 (0) and G9 (127), "C" indicates pitch, the number indicates the octave, and the number in parentheses indicates the MIDI note number. Note that Max pitch cannot go below Min pitch (if you want to use an inverted scale, use the BPF to invert it). While it is possible to set allowed pitches to the full range, do keep in mind that many sampler instruments only have audible notes for a predefined range. (A flute for instance may not be able to trigger bass notes.)
Min pitch
Min pitch sets the lowest note this instrument can play. It works the same way as Max pitch (see above). Note that Min pitch cannot go above Max pitch.
Transpose in scale
With Transpose in scale you shift the pitches that the instruments will play with the same cursor input, just as if you moved the cursor up or down without actually moving it. This can be set from -24 to +24 steps. Transposing in scale means that +3 would raise the root to the 4th, if using a major scale.
Transpose absolute
Transpose in cents allows you to transpose your instrument an absolute interval up or down defined in cents with a maximum of an octave up or down.
Transpose absolute Quantize
Quantize ‘Transpose absolute’ to semi-tone steps (100 cents).
Transpose ignores legato
If the current Rhythm generator is producing tied notes (For example, Legato Probability at 100%) and you start to transpose with this toggle turned off, the new pitches will trigger notes even if you don’t move the cursor. If you turn it on, new notes will only be triggered for non-tied notes or when moving the cursor to reach another pitch.
Chord map
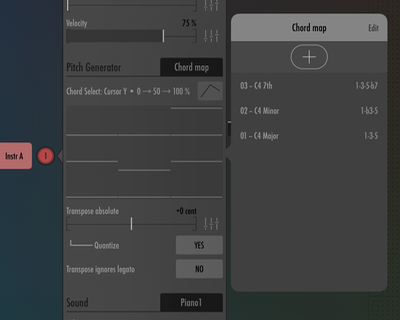
Chord map is another Pitch Generator. It allows the instrument to play chords instead of single pitches. To switch to Chord map, tap the button next to Pitch Generator and choose Chord map. The Chord map displays a grey panel with white lines indicating the individual notes of each chord. The chords are arranged from left to right in this panel.
To select which chords you want to include, tap this panel to open the Chord map editor. You can see the included chords in a list, sorted from bottom to top just as they are arranged along the Y-axis of the Play area. The list shows 3 different columns. The first is the number of the chord displayed as two digits, followed by the name of the chord with the root, and lastly which intervals make up that chord. To add another chord, tap the plus-sign and select a new chord from the list, as well as choosing the root note for this chord at the top.
If you want to delete a chord or rearrange the order, tap Edit at the top right of the Chord map editor. To delete a chord, tap the red circle with a white dash and confirm by tapping delete. To move the chord, grab the handle (3 horizontal lines) and drag it up or down.
Tip: The chords included in the Chords library are all in close root-position voicing. Using the Add Chord Formula it is of course possible to define alternative voicing, such as 3-12-17 for a triad with a third as base and the root and fifth an octave above.
Chord Select
Chord Select works as Pitch in Scale map, it uses a break-point-function to map the chord selection to Cursor Y-position (see Pitch in Scale map)
Chord map graphic
A visualization of the set of chords available for selection in this instrument. Tap it to open the Chord Map editor, where you can add chords to the set, choosing from a set of included pre-defined chords or defining your own.
Transpose absolute
Allows you to transpose your instrument’s chords in cents up or down.
Transpose absolute Quantize
Quantizes the ‘Transpose absolute’ to semi-tone steps (100 cents).
Transpose ignores legato
When off, does not re-trigger notes when you transpose. Same as in Scale map, see Transpose ignores legato.
Sound
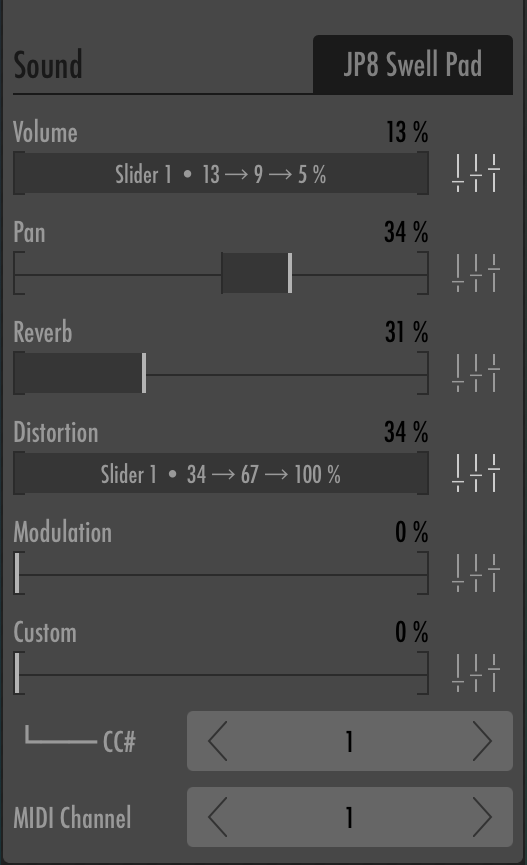
The sound options are located at the bottom of the instrument settings and allows you to change the sound of the instrument, used by the internal sampler. The black label tells you which sound you are currently using. By tapping on the black label you can choose a different sound. Your current selected sound will be marked with a blue checkmark. Gestrument comes with a variety of sounds in different categories, many of which are sourced from Creative Commons samples (see Sound Attribution).
Select (No sound) to disable the internal synth, which is useful if you want to use an external synth instead.
Volume
Allows you to adjust the level of this instrument, from 0% to 100%. Sends MIDI CC 7.
Pan
Allows you to pan the instrument’s sound. Sends MIDI CC 10.
Reverb
Allows you to set how much of the instruments sound you want to send to the global reverb. This parameter only affects the internal sound, and does not send any MIDI CC.
Distortion
Controls the amount of distortion/saturation. This parameter only affects the internal sound, and does not send any MIDI CC.
Modulation
Allows you to set the amount of modulation for your instrument. Not all internal sounds make use of this parameter. Sends MIDI CC 1.
Custom
Allows you to send a custom MIDI CC-message. For example if you set CC# to 64 you can use the slider to control the sustain pedal, or CC 11 for expression.
CC# for Custom
Allows you to define the custom CC.
MIDI Channel
When using MIDI output this settings sets which channel the instrument’s notes will be sent to. You can assign all 16 potential instruments to their own channel, and connect them to an external synth or another app. Set it to zero (OFF) to not send any MIDI.
Control Sources
You may notice in the instrument settings that most parameters have a small button to the right of the control - the symbol looks like 3 vertical lines with smaller horizontal lines intersecting the vertical lines. Tap it to open the Control Source menu, listing all the available sliders and other modulation sources.
When a Control Source is selected (shown with a blue checkmark), a Break-Point-Function will be shown at the bottom (see Break-Point-Function). You can use this BPF to remap how the control source affects the parameter and also modulate a control source via yet another control source using the Via function as shown in Via.
If you wish to stop controlling a parameter with a control source, go to the top of the menu and choose None (Constant).
Each Control Source can also be MIDI controlled.
Sliders
The sliders are located on the play area and can be linked to any control source.
You can read more about sliders in Sliders.
Cursor pressure
Cursor pressure is the amount of pressure being applied to a cursor (using a phone with ForceTouch or an iPad with an ApplePen), or how much skin is applied (other devices). The more of your skin that touches the screen the higher value the modulator gets, and vice versa.
Cursor Pressure can be controlled by ForceTouch or the ApplePencil if you enable it in the settings, read more about this at Use Force Touch for Cursor Pressure.
Random
If you want to randomize a parameter you can choose Random as your control source. Use the BPF to set the amount and range of randomness, optionally modulating the amount using a Via Controller.
Cursor X and Cursor Y
Choosing either Cursor X or Cursor Y allows you to control a parameter using the values from the instrument's cursor's X or Y position.
Cursor Speed
Will control a parameter based on the current speed of the instrument's cursor.
Via another Control Source
When mapping a Control Source to a parameter, you can choose to route it Via another Control Source. Tap Via and select another Control Source as your Via Controller. The Via Control Source will scale the first Control Source by 0 to 100%.
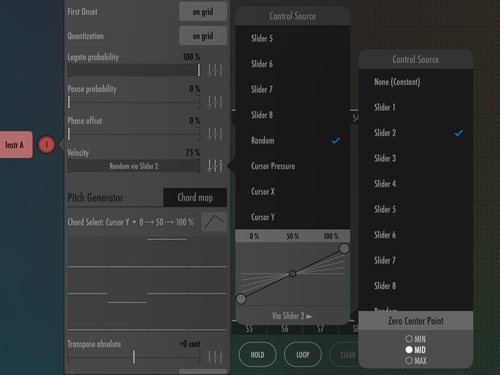
For instance, select Random as the first Control Source, and a Slider as Via, you can then control the amount of randomness with the slider. The Zero Center Point decides which part of the mapping BPF curve should be used as the value when the Via Control is at 0%.
Inter-App Audio
You can load Gestrument into any Inter-App Audio compatible host or DAW, such as AUM, Garageband, Cubasis, Auria or Audiobus 3 - for routing it through effects and/or recording the resulting audio.
Host Sync
Gestrument Pro supports Host Sync, allowing it to synchronize and follow the host transport and tempo. To enable this, toggle "Follow Host Sync" in the Clock menu to ON.
MIDI
Sending MIDI
One of the more powerful features of Gestrument Pro is its MIDI capabilities which allows for sending MIDI to external gear and computers.
Tap the settings cogwheel in the top bar to open Settings, where you can access the MIDI output and input settings.
Sending MIDI with a Network Session
Sending MIDI with a Network Session is a great way to use Gestrument to control your Synths or DAWs on another device.
To enable a Network Session on Gestrument Pro simply select Network Session as your MIDI output destination.
Receiving a Network Session on a Mac
To receive a Network Session on a Mac start the Audio MIDI Setup application and open the MIDI setup window.
Make sure that Session 1 (under Sessions) is enabled with a blue checkbox, and that there is a green light to the right of your iPad’s name (under Catalogue). Select your iPad and press connect, now you’re good to go! Just start your DAW or another application, select the Network Session as your MIDI input and start making music.
Sending MIDI with a hardware interface
You can send MIDI with a hardware interface such as a dedicated iPad interface (like the iRig) or a compatible audio interface connected via Lightning or Lightning to USB adapter.
Plug in your interface, tap the settings button, tap the MIDI output button and select your connected interface.
Receiving MIDI
Gestrument Pro has even further potential as a gesture based instrument with its MIDI Input. As with the Output, you first need to choose which of the available MIDI inputs you would like to use. Tap Settings, MIDI input and select a MIDI input in the list. Tap MIDI Controls to configure how Gestrument Pro should interpret incoming MIDI messages to control Sliders and Cursors. See MIDI Input for further details.
Receiving MIDI from a Network Session
Tap the MIDI input button and select the Network Session.
Receiving MIDI with a hardware interface
Plug in your interface, tap the settings button, tap the MIDI output button and select your connected interface.
Sharing and importing presets and scales
There are several ways of sharing presets and scales from Gestrument Pro, either by tapping share in the preset menu as described in (Preset menu), using the iOS Files app, or by using iTunes files sharing. To use iTunes file sharing connect your device to iTunes, tap the small iPad/iPhone icon at the top left, go to settings, file sharing, scroll down to Gestrument Pro, choose the files you want to import and drag them to your hard drive.
You can also import presets, scales and soundfonts through iTunes files sharing the same way.